Git Deploying a Bundled Angular 2 App using Angular CLI to Microsoft Azure

In this screencast I use the angular-cli tool for the first time to package an angular2 app for production before git deploying it to Microsoft Azure.

Screencast

Angular CLI

The CLI is at the moment of writing in beta and very much still a work in progress. It’s an excellent tool imho for scaffolding a new project, components and services. In this screencast we ran the following commands:

  ng new PROJECT_NAME // creates a new project
  ng g component COMPONENT_NAME // creates a new component
  ng g service SERVICE_NAME // creates a new service
  ng build -prod // builds a production ready version
  ng serve -prod // serves a production ready version

The CLI allows you to do a lot more, I really recommend you to install it and play with it for yourselves.

  npm install -g angular-cli

Also make sure to check out their official github repo which serves as great documentation.

Git Deployment

In this screencast we took a couple of short cuts, we didn’t setup a full CI environment. We initialized a new git repository in the dist folder and pushed only that folder to azure, meaning we built it on our dev machine, big NO NO. The workflow we want would look something like this instead.

  1. We commit a code change.
  2. Agent gets the latest code and builds it.
  3. Tests are run on build agent.
  4. If tests pass, deploy the dist folder to a staging slot.

Nevertheless we still need to enable a git repository for our web app, here’s an excellent guide on how to do that, it basically takes you through the steps I did in the screencast. Basically from the dist folder:

  1. git init
  2. git add *
  3. git commit -m “Initial Commit.”
  4. git remote add azure GIT_CLONE_URL
  5. git push azure master

These commands should fire up an authentication dialog and once you’ve provided the credentials the files should be pushed to the site.

Summary

With these steps we’ve managed to create a production build of an angular 2 app and deployed it to Azure. We did it all with just a few command lines using the angular CLI which was pretty awesome. The CLI does lagg behind the release candidates and is a work in progress so please use with caution.

Until next time, have an excellent day!

Azure Cloud Service Install Certificate Into Trusted Root Certificate Authorities Store with Azure Startup Task

Here’s a guide on how to install a certificate into Trusted Root Certificate Authorities store for Azure Cloud Services.

What we want to solve

In our case we had a web role (web app) that needed to communicate with a third party that we didn’t control, they were using a self signed certificate and required communication over HTTPS. For the TLS/SSL handshake to succeed we need to install the certificate into our trust store.

What others have done

There are solutions out there where people install the certificate using the portal into the personal store and then have a worker role move the certificate to the trusted CA store with administrative privileges at runtime. First of all, that’s a very cumbersome approach and second it uses resources that costs money, there is a much simpler way.

Solution

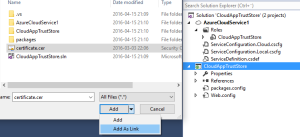
1. Include the certificate you want to install into your web app, optionally as a link.
azure-trusted-ca-1-add-certificate

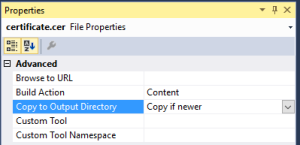
2. Make sure to set the Build Action to Content and Copy to Output Directory to Copy if newer.
azure-trusted-ca-2-content-copy

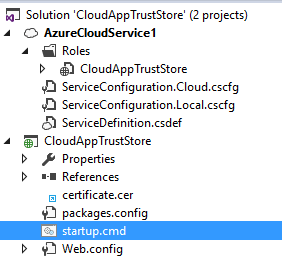
3. Add a startup.cmd also with Build Action set to Content and Copy to Output Directory set to Copy if newer.
azure-trusted-ca-3-startupcmd

4. Modify the contents of startup.cmd to the following:

certutil -addstore root certificate.cer

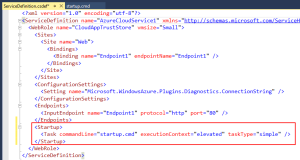
5. Open up ServiceDefinition.csdef and add the following lines to your web role configuration section.


Full context in our simple sample looks like this:
azure-trusted-ca-4-service-definition

6. You’re done! Next time you deploy the cloud service the certificate will be installed into the Trusted Root Certificate Authorities store for the VM.

What _not_ to do

You can find answers on stack overflow and blogs on how to install the certificate manually by remoting to the machine and using mmc locally. That is a bad idea since it will be gone next time the VM is teared down and re-created. And if you’re new to Azure Cloud Services, that’s not strange at all, it happens.

Final Words

These 5 steps are super easy compared to many other proposed solutions out there. We learned about it from security expert Dominick Baiers blog post from a while back, it’s a lot shorter but as he states — the title says it all!

Hope it helped!