Angular 2 Upgrading to new 3.0 Router

In this episode we upgrade the ng2play repo to leverage the new 3.0 router and implement a route guard to protect components that require authentication. Here’s the entire changeset, not that bloody considering the changes but this is also a very small application.

Screencast

Defining Routes

With the old router we decorated our app component with the RouteConfig annotation to configure the routs.

  @Routes([		
    { path: '/', component: Todo },
    { path: '/about/:id', component: About },
    { path: '/profile', component: Profile}		
  ])
  export class AppComponent { ... }

With the new router the routing configuration is no longer bound to a specific component, instead we make it accessible as a provider by exporting it as a const from a separate routes.ts file. Another essential change is that we need to remove the forward slash in the beginning when defining the path.

  import { provideRouter, RouterConfig } from '@angular/router';

  export const appRoutes: RouterConfig = [
    { path: '', component: Todo },
    { path: 'about/:id', component: About },
    { path: 'profile', component: Profile }
  ];

  export const APP_ROUTER_PROVIDER = provideRouter(appRoutes);

Wich we can pass in to the bootstrap function in boot.ts instead of passing ROUTER_PROVIDERS as we did earlier.

import {APP_ROUTER_PROVIDER} from './routes';

bootstrap(AppComponent, [
  ...
  APP_ROUTER_PROVIDER,
  ...
]);

Route Parameters

A component that we route to can access information about route parameters, query parameters and URL fragments by something called, ActivatedRoute, which we can inject into the constructor. The key difference is that route parameters can be accessed through the params property as an Observable or by the snapshot property if subscribing for future changes is overkill. Here’s both ways in our about.ts component:

  import {Component, OnInit} from '@angular/core';
  import { ActivatedRoute } from '@angular/router';

  @Component({
    selector: 'about',
    template: `Welcome to the about page! This is the ID: {{id}}`
  })
  export class About implements OnInit {
    id: string;

    constructor(private route: ActivatedRoute) {}

    ngOnInit() {
      this.id = this.route.snapshot.params['id'];
      this.route.params
        .map(params => params['id'])
          .subscribe(id => {
            this.id = id;
        });
    }
  }

Guarding routes

Previously we could prevent our components from activating for unauthenticated users by using the @CanActivate and @CanDeactivate annotations. The guarding logic could be put inside a callback function:

import {CanActivate} from '@angular/router';
@Component({ ... })
@CanActivate(() => tokenNotExpired())
export class Profile { ... }

This approach suffered from that we don’t have access to the applications dependency injection and that we need to decorate each component class with it. The new router solves these problems, we can easily create an auth-guard injectable service that we can pass in to the route configuration accordingly:

  import { provideRouter, RouterConfig } from '@angular/router';
  import { AuthGuard} from './auth-guard';

  export const appRoutes: RouterConfig = [
    { path: '', component: Todo },
    { path: 'about/:id', component: About },
    { path: 'profile', component: Profile, canActivate: [AuthGuard] }
  ];

  export const APP_ROUTER_PROVIDER = provideRouter(appRoutes);

The auth guard has access to the applications dependency injection and we can redirect the user to the root component if they are not allowed to navigate to the component.

import {tokenNotExpired} from 'angular2-jwt';
import { Injectable } from '@angular/core';
import {
  CanActivate,
  ActivatedRouteSnapshot,
  RouterStateSnapshot,
  Router
} from '@angular/router';

@Injectable()
export class AuthGuard implements CanActivate {
  constructor(private router: Router) {}

  canActivate(next: ActivatedRouteSnapshot, state: RouterStateSnapshot) {
    if (tokenNotExpired()) {
      return true;
    }

    this.router.navigate(['']);
    return false;
  }
}

Let’s also not forget that we’ll need to pass the auth-guard to our bootstrap method to be able to resolve the dependency:

import {APP_ROUTER_PROVIDER} from './routes';
import {AuthGuard} from './auth-guard';

bootstrap(AppComponent, [
  ...
  APP_ROUTER_PROVIDER,
  AuthGuard
  ...
]);

Summary

With these steps we’ve managed to migrate our application to the new 3.0 router, quite frictionless seemingly, but imho they started calling angular2 for RC way too early. It’s still moving too much to even consider using this for production anytime soon.

Until next time, have an excellent day!

Cookie vs Token Based Authentication with Angular2 using ASP.NET 5

I recently produces a series of tutorials on how to piggy back on aspnet5’s cookie based authentication in an angular2 application. If you’d like to learn more about how aspnet5 and angular2 can be used together, make sure to check out the full series here.

Part 1: Up and running with ASP.NET 5 Identity

Part 2: Cookie Based Auth with ASP.NET 5 and Angular 2

Part 3: Discussion

Hope you enjoy the videos and make sure to subscribe if you do, cheers!

Authenticating Your Angular SPA with ASP.NET Web API and Auth0

My first pluralsight course is live, make sure to check it out and give it a thumbs up if you like the course!
http://www.pluralsight.com/courses/authenticating-angular-spa-aspnet-webapi-auth0

Curious about the authoring experience? Read about it here!

Cheers!

socialtime.se lab days project

Lab days

I’ve been super busy at work but finally I’ve come around for some fun lab days coding.

The objective

I’ve often wondered how much time we spend on social media apps on our phones. The idea came pretty naturally – create an app that accurately measures the time for us.

Coding sessions

The 1.0 version of socialtime.se was coded in 4 sessions and this is how I disposed the time. The sessions are 1 or 2 days apart since I rarely have the time to sit and code for 8h straight nowadays, unless it’s for a paying customer of course.

  1. 2h developing the android app for monitoring running processes.
  2. 1h studying the android facebook SDK and implementing auth from the app.
  3. 4h developing REST backend with facebook auth and a super simple frontend.
  4. 1h publishing the app to play store and minor refactorings.
  5. 1.5h writing this blog post, 45 minutes on creating the graphics ;-)

Android App

The app is really basic, it has a background service running which monitors the running processes on a separate thread and just one activity to display the social time.

socialtime_app_v1.0

My first approach was to read the log and filter for ActivityManager since that seemed to work with the adb. But when running logcat from within the app I didn’t get the same information, which I guess is a good thing looking at it from a security standing point.

REST API and Authentication

Since we initially only measure facebook time it’s safe to assume that the users could use facebook to authenticate themselves. One other upside is that we can retrieve their identity by requesting their public information, meaning they won’t need to create a local account for providing a username.

This is where it became interesting, we’ve built a backend using asp.net webapi which allows authorized calls if the user’s authenticated via facebook. The user is authenticated via facebook but via the app, we can’t use the access token issued for the app to communicate securely with our backend. So this is my solution.

android facebook webapi authentication

In a sentence – We issue a new custom token by validating the facebook access token that is passed to us which can be used for secure communication. Pretty neat!

Frontend

I think it was about 2:55am when I finished the app and the API and everything was in place and working. My deadline was 3pm and not a minute more, I needed to be at work 9am and since I’m not in my twenties anymore I need the sleep to function properly.

I hosted the backend in an azure website and I had bought the domain socialtime.se via surftown and once I uploaded the page to surftown I noticed it couldn’t fetch the data. Why? You guessed it, I hadn’t enabled cross-origin resource sharing. So I quickly just installed the nuget package for cors, enabled it, decorated the controller with a EnableCors-attribute, re-deployed the API and voilá, beautiful fully working stack in place. And all this exactly as the clock turned 3am!


socialtime_v1.0

It isn’t pretty but hey, it worked!

Future

The infrastructure is in place so adding functionality will go fast. My unprioritized backlog looks something like this.

  • Measure time for Twitter, Instagram and G+, separately.
  • Measure time spent per app and per day. (now it’s just milliseconds since forever)
  • Proper frontend and move it to azure.
  • Remove the public list, you’ll need to login to see only your social time. Several requests for this actually :-)
  • Use some cool HTML5 charting lib to display your social time.

Until then, get the app and have a nice day!


googleplay


Become your own Root Certificate Authority and Create Self-Signed SSL Certificates

Why do we want to do this? Sometimes having to pay for commercial SSL certificates isn’t an option. By creating your own Root Certificate you can sign your own certificates to allow you to quickly and cheaply secure internal websites or applications that use SSL.

In this post we will
  1. Setup Cygwin and OpenSSL
  2. Generate a Root Certificate
  3. Deploy our Root Certificate Authority
  4. Create a Certificate Signing Request
  5. Generate a signed SSL certificate
  6. Deploy the SSL certificate to IIS
We’ll also test it from an android device by
  1. Deploying the CA certificate to the trust store
  2. Browse our webserver securly with no warnings
  3. Securly download resources from an app
Let’s get started!

Setting up the environment

Prerequisites

  • Android SDK with an AVD running 4.x or a real device
  • JDK 1.6.x or higher
  • IntelliJ or your favorite editor
  • IIS 7.x or higher

Install Cygwin and OpenSSL

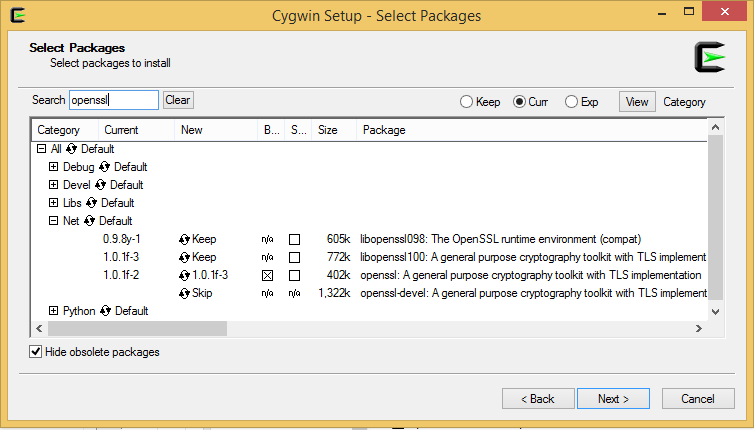
Download Cygwin and run the installer, make sure check the openssl packages.
root_ca_cygwin
Open C:\cygwin\usr\ssl\openssl.cnf and find the section beginning with [ CA_default ], edit it so it looks like this:
[ CA_default ]
 
dir             = /etc/ssl		# Where everything is kept
certs           = $dir/certs		# Where the issued certs are kept
crl_dir	        = $dir/crl		# Where the issued crl are kept
database        = $dir/CA/index.txt	# database index file.
#unique_subject = no			# Set to 'no' to allow creation of
					# several ctificates with same subject.
new_certs_dir   = $dir/newcerts		# default place for new certs.

certificate     = $dir/certs/cacert.pem 	# The CA certificate
serial          = $dir/CA/serial 		# The current serial number
crlnumber       = $dir/crlnumber	# the current crl number
					# must be commented out to leave a V1 CRL
crl             = $dir/crl.pem 		# The current CRL
private_key     = $dir/private/cakey.pem# The private key
RANDFILE        = $dir/private/.rand	# private random number file
Open a cygwin command shell and create the directories:
mkdir /etc/ssl/{CA,certs,crl,newcerts,private}
Create the certificate index file:
echo "01" > /etc/ssl/CA/serial
touch /etc/ssl/CA/index.txt

Generate the Root Certificate

We can now generate the Root Certificate with the following command:
openssl req -new -x509 -extensions v3_ca -keyout cakey.pem -out cacert.pem -days 3650
You’ll be asked to provide a private key – this password should be complex and kept secure as it will be needed to sign any future certificates. If someone was to get their hands on this they would be able to generate certificates in your name! You should have two files, cakey.pem which is your private key and cacert.pem which is the Root Certificate. Let’s move the certificate and the key to the correct folders.
mv cakey.pem /etc/ssl/private
mv cacert.pem /etc/ssl/certs

Trust our Root Certification Authority

Let’s add the root certificate to our trust store so we don’t get warnings from websites using a SSL certificate signed with our root certificate. The best way to do this is by deploying it through a group policy, I’ll add it manually since this is my dev machine.
  • <windows> + R (Run) -> mmc <enter>
  • Add the certificates snap-in <ctrl> + m, select Certificates and add snap-in for Computer account
  • Expand Console Root -> Certificates -> Trusted Root Certification Authorities -> Certificates
  • Right-click -> All Tasks -> Import… Select cacert.pem located in C:\cygwin\etc\ssl\certs
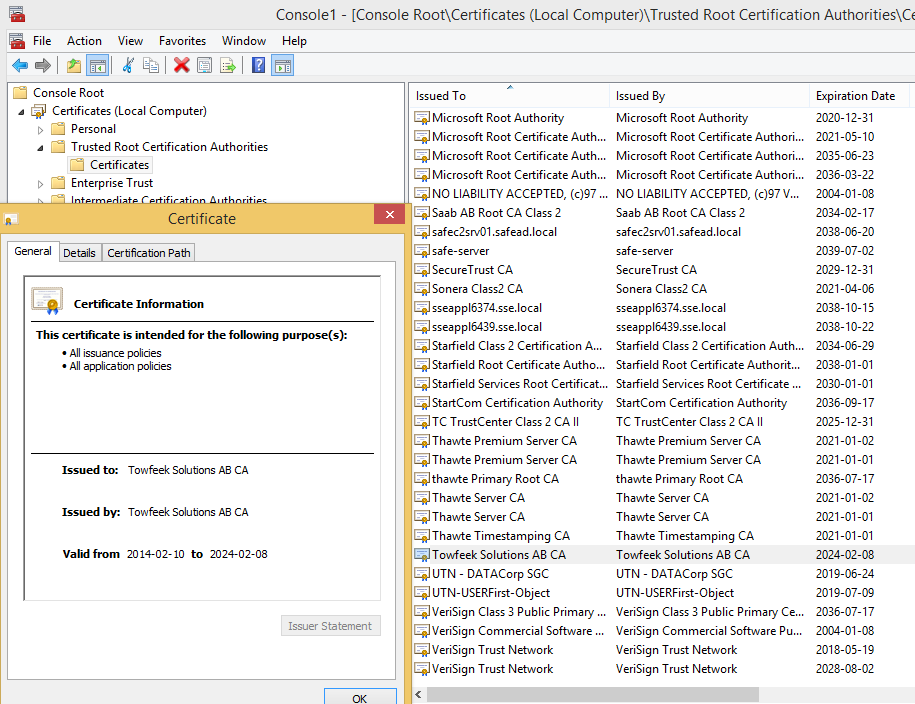
If you view the imported certificate it should look something like this:
root_ca_trust

Create a Self-Signed SSL Certificate

Now that we have successfully created a new Root Certificate we can use it to sign our own certificates. We need to create a Certificate Signing Request (CSR) before we can create a SSL certificate.

Generate the Certificate Signing Request

First create a Private Key that will be used during the certifcate signing process:
openssl genrsa -des3 -out server.key.secure 4096
Now that we have a Private Key we can use it to generate the Certificate Signing Request, this is the file that you would normally send to a Certificate Authority to generate a certificate. This will ask for the password for your private key as well as various details. When asked for the Common Name (CN) enter the domain name that the SSL certificate will be used for. You can enter the IP address of the server but many hostname verifiers on various devices won’t accept this, more specifically the DownloadManager in Android won’t accept it.
openssl req -new -key server.key.secure -out server.csr

Generate a signed SSL certificate

Now we have a CSR that we can generate a signed SSL certificate from:
openssl ca -in server.csr
Confirm the passphrase and answer yes to both signing the certificate and commiting it to the database and you should be able to find a new file in C:\cygwin\etc\ssl\newcerts, the file will probably be called 01.pem and this is your SSL Certificate.

Create a pkcs12 file to import in Personal Certificate Store

Before deploying it we need to do one more thing. If we tried to use this with the private key we created earlier IIS would ask us to confirm our private key passphrase each time it started. To avoid this we should take our private key and create an insecure version of it, this will allow IIS to load your SSL certificate without needing the passphrase.
The downside is that anyone who gets a copy of your insecure key can use it to impersonate your SSL certificate, therefore it’s important to secure the folder it’s stored in.
openssl pkcs12 -export -in <pem-file-from-previous-step> -inkey server.key.secure -out cert.p12

Deploy the SSL Certificate to IIS

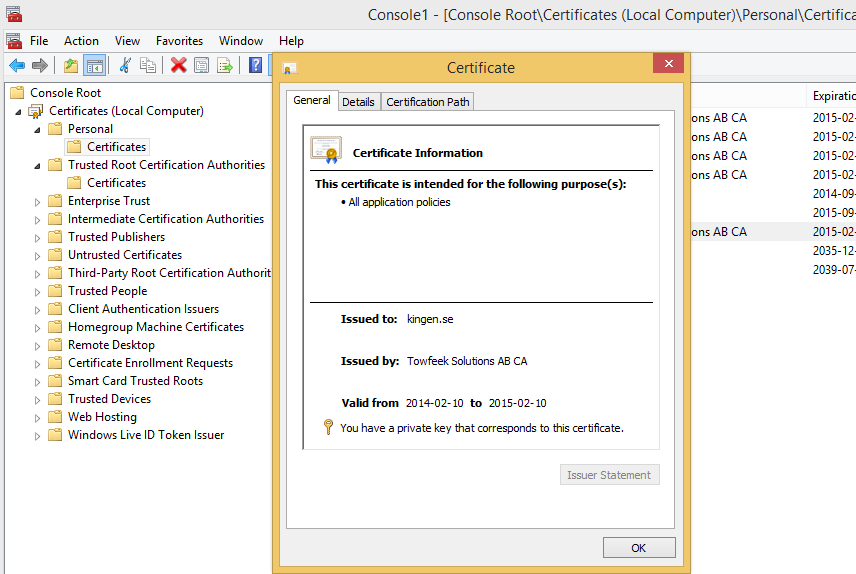
Open the Management Console again but this time import the pk12-file to Certificates -> Personal -> Certificates, it should look something likes this:
root_ca_trust_personal
Bind the SSL certificate to port 443 on your Default Web Site in IIS.
  • Open IIS Manager (<windows> + R -> inetmgr)
  • Select Default Web Site
  • Click on Bindings under Actions
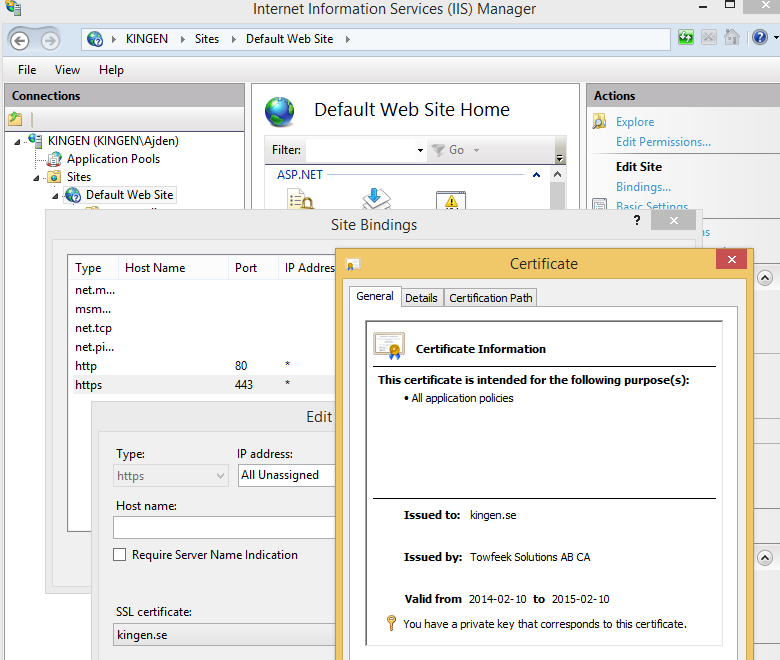
  • Edit the https binding and set the SSL Certificate
When you’re done it should look something like this:
root_ca_iis_binding
And if everything is done correctly you shouldn’t get any warnings when browsing your site.
root_ca_verified_site

Edit your hosts file to use any hostname you want on your machine

As I mentioned earlier all devices/browsers don’t trust certificates issued to an IP address. Add a record to your C:\Windows\System32\drivers\ets\hosts to resolve any hostname you want to 127.0.0.1.
127.0.0.1       kingen.se
127.0.0.1       facebook.com
And you’re all set! Now let’s access our server via HTTPS from an android device.

Install CA Root Certificate on Android

Pre Ice Cream Sandwich (Android 4.0) there was no way to add a new CA to the trust store, so we built our own custom keystores which we loaded in from code in our applications. The process was quite cumbersome! Now we can simply push the certificate to our phone using adb and install it.
First we need to export the Root Certificate from the Management Console as a DER encoded binary since android can’t install pem-files.
  • Right-click on Console Root -> Certificates -> Trusted Root Certification Authorities -> Certificates -> <your Root Certificate>
  • Select All Tasks -> Export…, DER encoded binary, and save it somewhere.
Now let’s install it on a device or emulator, the steps are the same.
  • adb push <your.cer-file> /sdcard/.
  • Enter Settings -> Security -> Install from device storage on your Android device
  • Press Ok and Confirm your PIN
Your Trusted Credentials Store should now display your Root Certificate:
root_ca_android_trust_store
Before navigating to your machine from a browser we must make sure that our selected hostname resolves to our machine on the device. In the emulator it’s quite easy but to modify the hosts file on a real device you need root access.

Modifying the hosts file

We want the device or emulator to resolve the hostname we issued the SSL certificate for to your machine. Basically the same thing that we did for windows.
Update the /etc/hosts on the emulator
  • adb pull /etc/hosts
  • <add record to your machine with notepad>
  • adb remount
  • adb push <modified-file> /system/etc/hosts
Update /etc/hosts on an actuall device (requires root access)
  • adb pull /etc/hosts
  • <add record to your machine with notepad>
  • adb shell
  • su
  • mount -o rw,remount -t yaffs2 /dev/block/mtdblock3 /system
  • chmod 0326 /system/etc/hosts
  • exit
  • adb push <modified-file> /system/etc/hosts

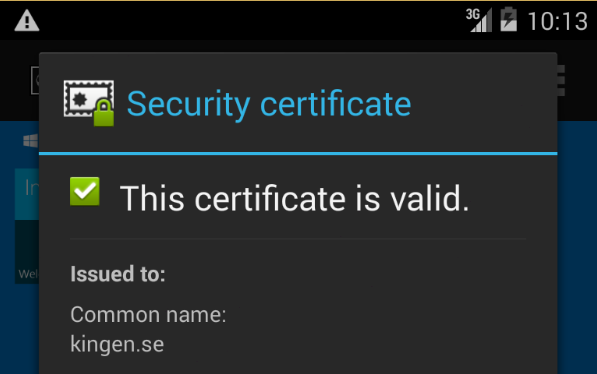
Verify that our server is trusted

Finally we can open up any browser we like and navigate to our server and we shouldn’t get any warnings for our self-signed SSL certificate.
root_ca_android_cert_valid
Any app that fetches data from our server can now do it securly over HTTPS without the need of loading a custom keystore since the server is trusted.
Let’s verify this with a simple app that downloads an image with the DownloadManager.

Securly download an image

The code is very straightforward and needs no deeper explaination, we simply request to get an image from the server over HTTPS via the DownloadManager and expect it to work. Download the full source code (14.8KB) for the sample app if you like but it aint much for the world.

root_ca_android_download

Final words

There are quite many steps to get this to work and there aren’t many guides out there covering the full example so I figured I share my experience, since sharing is caring ;-) Almost all apps today fetch some kind of data and we should concider doing it in a secure manner as often as possible. Sadly when you browse the forums really bad and unsecure suggestions are marked as the accepted answer. It’s kind of scary when you think of that developers like the one below might have coded some app or software that you’re using.

I’ve found a very easy solution for this:
request = new DownloadManager.Request(sourceUrl.replace(“https://”, “http://”))
Surprisingly worked for all https URLs that I tried. I’m not sure about the https security, but there is no exception and file gets downloaded properly

Anyways, I hope this helps someone out!

Using Microsoft OAuth Identity provider with IIS Express

Shouldn’t be any problem right? Facebook apps allows you to specify localhost for the callback/redirect url. Sweet! But microsoft doesn’t! So this is what I did.

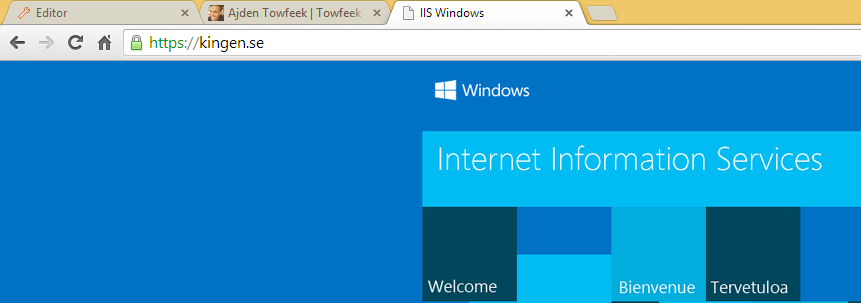
I created a new application https://account.live.com/developers/applications/create and specified kingen.se as redirect domain.

I added a DNS record to C:\windows\system32\drivers\etc\hosts that routes 127.0.0.1 to kingen.se.

I changed the site binding in %Documents%\IISExpress\config\applicationHost.config :

<site name="<site name>" id="24">
  <application path="/" applicationPool="Clr4IntegratedAppPool">
    <virtualDirectory path="/" physicalPath="<your-path>" />
  </application>
  <bindings>
    <binding protocol="http" bindingInformation="*:80:kingen.se" />
  </bindings>
</site>

I changed the “Default Web Site” binding to port 8080 (or whatever) for IIS.

I turned off SQL Reporting Services because the agent used port 80. Use netsh to list port usage if you run into other problems.

netsh  http show urlacl | Select-String :80
Finally in my asp.net mvc project I changed the properties for the project to
  • Use Local IIS Web server
  • Check Use IIS Express, Project Url: http://localhost
  • Check override application root URL: http://kingen.se
  • Set Start URL to: http://kingen.se/
Voilá, press F5 and IIS Express will fire up on http://kingen.se with a working Microsoft OAuth Identity provider.
Cheers!

Lab days with focus on security (STS, WebApi, WCF and WIF)

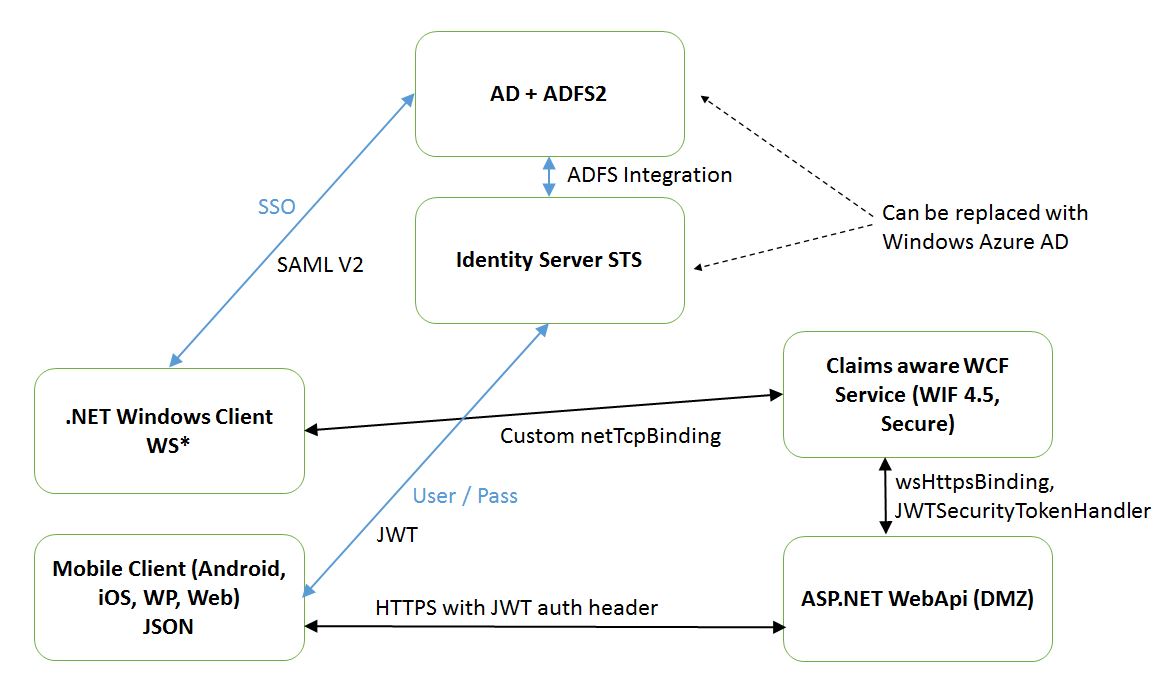
Lab days once again at work, this time I focused on security. Can’t share the code this time since it contains some company confidential stuff but the diagram below basically summarizes my architecture idea.

lab_days_security

Securing WCF service with WIF

There are plenty of blogs out there descibing how to do this so I’m not going to explain this i depth, if you however only have experience with using WIF 3.5 as me I found an excellent migration guidelines page on msdn (http://msdn.microsoft.com/en-us/library/jj157089.aspx). We use a custom binding for tcp transport support with reliable sessions which makes you wanna kill yourself when you see the binding configuration. Due to this I can’t share the code since it is considrered “intellectual property” of Saab (me?).

Important WIF 3.5 to 4.5 change!

You could previously access the calling users claims in the WCF service by casting ServiceSecurityContext.Current.PrimaryIdentity to ClaimsIdentity. This is no longer true, you’ll get the claims by casting Thread.CurrentPrincipal to ClaimsPrincipal or Thread.CurrentPrincipal.Identity directly to ClaimsIdentity. For this to work you’ll also need to set <serviceAuthorization principalPermissionMode=”Always” /> on the service behavior declaration. See also Dominick Baiers post for more details.

JWT, Identity Server v2 and WebApi

I’ve updated our development STS in our product at work from startersts to identityserver v2, which I thought was a great platform to continue exploring, especially since it supported to issue JWT (json web tokens). At least I thought it did until I discovered that it doesn’t! They do however have a branch that supports it and uses Microsoft JWT (https://github.com/thinktecture/Thinktecture.IdentityServer.v2/tree/Microsoft-JWT).

I found a nice message handler that validates JWTs which uses JSON Web Token Handler For the Microsoft .Net Framework 4.5 written by the security guru Vittorio Bertocci (http://code.msdn.microsoft.com/AAL-Native-Application-to-fd648dcf/sourcecode?fileId=62849&pathId=697488104). And as always I encountered major problems when trying to validate the JWT issued by identity server on the server-side (webapi). Victor uses windows azure ad together with Windows Azure Authentication Library which of course validates the token correctly.

I think there is a may release coming up for identity server, perhaps I’ll give it another shot then, but for now I had to use Azure AD.

The outcome wasn’t actually what I expected when I began but the road there was educative, I suggest following Victor on http://www.cloudidentity.com/blog to keep up with the updates on the json web token handler which currently only is in the developer preview stage. It hurts to keep up and always use bleeding edge technology but hey, they don’t call it lab days for nothing. ;-)


Peace!